Tracking projects and managing resources are not easy tasks. Managers often need to track the progress of the project as a whole and the individual work of users. Unfortunately, in Jira, there is no easy way of doing this.
Teams view in Jira
In Jira, "Teams" refer to a way of grouping users together to work on a group of projects or issues. The concept of teams in Jira can be particularly helpful for larger organizations or projects where there are multiple groups working on different aspects of the same product or service.Here's a general overview of how the "Teams" feature works in Jira:
- Creating Teams: Jira administrators or project administrators can create teams within the Jira instance. These teams can be based on functional areas, project teams, departments, or any other relevant grouping.
- Assigning Members: Once a team is created and manager add members, users can be added to the team. Team members typically include individuals who are responsible for specific tasks, projects, or issues related to the team's focus.
- Work Allocation: When creating or updating issues in Jira, users can associate issues with specific teams. This helps in categorizing work based on the teams responsible for handling it.
While the "Teams" feature in Jira provides an effective way to manage team-related work, it's important to acknowledge that the feature's functionalities may vary depending on the version of Jira in use and any customizations or changes the organization has implemented.
Teams view in ActivityTimeline
ActivityTimeline offers a timeline dashboard that encompasses three distinct views:
- Team View
- User View
- Team with Users view
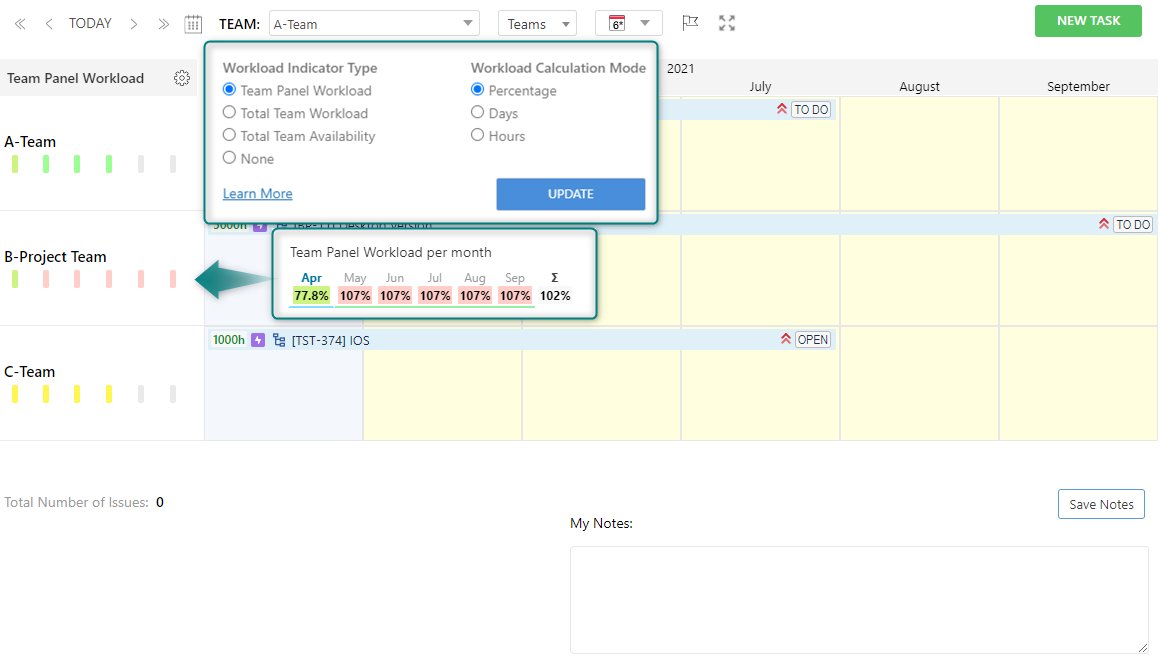
Opting for the "Team View" option enables you to access a dedicated dashboard displaying tasks exclusively assigned to your team.Here, you'll discover a dedicated dashboard displaying exclusively the tasks assigned to your team. This feature proves incredibly valuable when orchestrating extensive work initiatives such as Epics or Program Increments, as well as when strategizing tasks across departments or even company-wide. Select from a range of timeframes, including short and long-term perspectives. Efficiently strategize and plan for multiple teams simultaneously while also establishing overarching, long-term goals.
What are Jira Project Teams in ActivityTimeline?
What if we say that you can set up several project teams in a couple of minutes? ActivityTimeline provides such an opportunity. Project teams will be created automatically by the system, based on the information from the Jira software regarding people that work on the specific project.
After that, you will see the overall progress of the project with the help of the Team timeline of that project team.
Users will also get an understanding of and what the users are working on specifically on the Individual timelines.
ActivityTimeline gives clear teams' workflow visibility as users can simultaneously track several projects and several project teams on the dashboard screen.
In order to create such a team, follow the next instructions:
- Go to the Configuration menu
- Find Projects Tab
- Click ‘Create' near the project name
A new team of users who are connected with the specific project will be created automatically. The setup process took only several minutes.
Enjoy project planning and resource management in one place, and ease your workflow with our Tips&Ticks.
Conclusion
ActivityTimeline in Jira enhances project planning and resource management. By offering clear visibility into team workflows, it empowers users to concurrently track multiple projects and teams, ultimately streamlining workflows and enhancing overall efficiency.